White to move and mate in 2.
Saturday, June 19, 2010
Friday, June 18, 2010
Thursday, June 17, 2010
Wednesday, June 16, 2010
A Beginner's Guide, Part 4, Castling
Castling is a new move in chess. Well, relatively new. It became popular in its current form around the 1700s to 1800s. The basic idea was to speed up the game. Because the King is a slow moving piece, players in the past would have to spend 3 or 4 moves setting up the castled position. Instead of doing all of this, now a days, players can castle in one move. Players can castle either towards the right side of the board, called the Kingside, or to the left side of the board, called the Queenside.
As a brief aside:
From the d file to the left is called the Queen side. From the e file to the right is called the King side. These names arent official and have no real impact on the game. It is simply a way for chess players to talk or write about various chess concepts in a simple way. For example, "I was attacking on the Queen side and he was counter attacking on the King side," or "I had a Queen side pawn majority and he had a King side pawn majority."
Back to castling.
Before a player can castle they must make sure there are no pieces in the way.
In this position, note that the squares f1 and g1 are clear. White's Knight and Bishop have moved off of these squares, and now White can castle King side.
When you castle Kingside, you place your King on g1. Then you place your Rook on f1.
There you have it, quick learning beginner. You now know how to castle King side!
Queen side castling is also possible. It is very similar to King side castling.
Notice how in this position the squares b1, c1, and d1 are all clear. With nothing blocking the way, White can castle Queen side. To castle Queen side, White places his King on c1, and his Rook on d1.
Simple!
Well, unfortunately, not quite that simple. There are a few other rules of castling.
The first rule is that neither the King nor the Rook the player wants to castle with can move. If either piece moves, castling is not possible.
Looking at the above example of Queen side castling, if White move his Rook to b1, and then back to a1, he will not be allowed to castle Queen side. However, if he moves his Light Squared Bishop off of the f1 square, he will still be able to castle King side.
If he moves his King to d1, though, he will not be allowed to castle either King side or Queen side.
Finally, the King is not allowed to move through check to castle. Check, and checkmate were explained in A Beginner's Guide, Part 3, Winning. Keep in mind that the Rook is allowed to move through an attack, though.
As a beginner, dont worry too much about moving through Check. Just know that if the computer is not allowing you to castle, this may be why.
Tuesday, June 15, 2010
Monday, June 14, 2010
A Beginner's Guide, Part 3, Winning
The goal of chess can be a bit confusing for a beginner.
Basically, the goal of chess is to capture the opponent's King. Sort of.
In the old days, meaning 500-700, this was the goal of chess, or rather, of the early forms of chess. Around 700-800, however, new rules were introduced to make the game more interesting. Hence, Check and Checkmate were developed.
The idea of Check is that if an opponent's King is in danger of being captured, you say Check, informing your opponent of this danger. He then knows that he should move his King, otherwise you will capture it and the game will end. This is basically a courtesy you give to your opponent so that a good and interesting game is not ended prematurely by a foolish blunder.
Eventually, this courtesy was changed into a rule of the game. Now a days, it is illegal for your opponent not to parry the threat against his King. If your opponent does not parry the threat, you do not capture his King and win the game. Instead, you inform your opponent of his illegal move, go back, and he has to make a legal move.
Looking at my Chess Tactic of the Day #3, find the move Ng6+. When the Knight moves to g6, it is attacking the King. Thus, the King is in check and must somehow parry the threat of the Knight. In this position, the only way to parry this threat is to move the King, so the Black King must move.
The Black King cannot move into Check, and so his only legal moves are f5 and g5. He cannot move to e3, e4, or e5 because the Queen is threatening those squares. Similarly, he cannot move to g3 because the Queen is threatening this square. The Bishop is threatening the f3 and g4 squares, so the King cannot move there.
This is how Check works. The King is threatened by another piece, and your opponent must protect his King. He can move his King to an unthreatened square, he can capture the piece that is threatening him, or he can block the threat with another one of his pieces. Dont get hung up on these three things just yet.
Following from this, then, is the idea of checkmate. This is occurs when your opponent's King is in check, ie, in danger of being captured, but he is unable to parry the threat against his King.
This position occurs if Black decides to parry the threat against his King by moving to the f5 square. In this position, it is White's move and he can checkmate Black's King. White checkmates Black's King by playing Qe5#.
First, notice how the Black King cannot capture the White Queen. The Queen is protected by the Knight. Thus, Black cannot parry the threat against his King by capturing the attacker. Second, notice that White's King is defending the White Knight, so Black cannot capture the Knight.
Black must move to get away from the Queen's threat. The problem for him is that he cannot move to a safe square. Black cannot move his King to e6 or e4, as the Queen is threatening those squares. Similarly, the Queen is threatening g5 square. Both White's Queen and Knight are threatening the f4 square. Both White's King and White's Queen are threatening the f6 square. Finally, White's Bishop is threatening the g4 square.
White has threatened all of the squares the Black King can move to, and Black cannot capture the Queen that is threatening his King. Finally, Black has no way of blocking the Queen's attack against his King. Black's King is in check, and he has no way to parry the threat. Thus, Black is checkmated.
Lets go back a second and see what happens if Black had moved his King to g5, instead of f5.
In this position, White can still checkmate the Black king. White can do this by playing Qa5#. White can also checkmate the Black King by playing Qe5#, but lets look at Qa5# this time instead.
Here, again, we can see that the Black king is under attack by the White Queen. The Queen is too far away for Black to even consider capturing. Black has no pieces left that he could otherwise move between the Queen and his King. So, he cannot block the Queen's attack against his King. Thus, once again, Black's only choice is to try and move his King.
However, he has no safe squares to move to. The Knight is still protected by the White King. The White King is also threatening the f6 and h6 squares, so Black's King cannot move there. The White bishop is threatening the g4 square. White's Queen is threatening f5 and h5. Finally, White's Knight is threatening the f4 and h4 squares.
Notice in this checkmate position how each of the pieces has a job, and how well the pieces work together with each other. That is a bit more advanced concept, but spotting this type of harmony between the pieces is always helpful!
One last thing with this position, look how things both change and do not change if Black has an extra piece.
I have added a Black Rook to the position. Here, Black can parry the Queen's threat against his King by playing Rd5. This prevents checkmate, but unfortunately for Black, it only prevents it for one move. White can play Qxd5, and the position is effectively the same as it was with the Queen on a5. Black cannot parry the threat again, and so he is still checkmated.
This position doesnt look all that realistic, though, does it? Chances are, very few of your games will ever reach this position. However, solving these types of tactics can help you get a grasp on piece harmony.
Lets look at one more example though, and this time we will look at something a bit more realistic. This game was played by an interesting massive lego/robot chess board!
Hopefully, if your games look like this you are playing Black! I am going to ignore the opening and skip to move 7.
White's King is under attack by Black's Bishop on f2. The King cannot capture the Bishop, because it is defended by Black's Knight on e4. The King cannot move a piece between the Bishop and his King, because the Bishop is right next to the King. Thus, the King must move.
The King cannot move to the f1 or d1 squares, because his Queen and Bishop are already there. He cannot move to the d2 square, because the Black Knight is threatening that square. His only other remaining square is e2, and so the King must move to e2.
Now, Black's other Bishop is attacking the King. The King cannot capture the Light Squared Bishop on g4 because it is too far away. White is unable to move a piece to the f3 square. If he could, this would parry the threat and he would not be checkmated. White's only other option is to move his King.
His King cannot capture the Dark Squared Bishop on f2, because as noted before, Black's Knight on e4 is defending it. He cannot move to f1 or d1 because his Bishop and Queen are still there. Similarly, he cannot move to d3 because his Pawn is there. He cannot move back to e1 or to e3 because Black's Dark Squared Bishop on f2 is threatening those squares. He cannot move to d2, because Black's Knight on e4 is still threatening that square. Finally, he cannot move to f3, as Black's Light Squared Bishop on g4 is threatening this square.
If you are having difficulty following all this d2, f3, e4 chess notation, that is fine. Just look at the diagram, and try and find all the ways the Black pieces are preventing the White King from escaping checkmate. You can always name the squares later; for now it is good just to see how Black controls them!
Indeed, Black is controlling all the squares around White's King. White cannot move his King, and his King is in check. Therefore, White is checkmated, and Black has won the game.
As a beginner, all the different squares and possibilities for the opponent's King is probably overwhelming. For most beginner games, though, checkmate is achieved in less complicated ways. Here is an example of a simpler checkmate.
This is a fairly common and simple way to achieve checkmate. Black simply has his Rook and Queen take away all the squares along the 1st and 2nd ranks, and the White King has no where to go.
Here is another simple way for Black to checkmate White's King. Black's King defends the Black Queen. The Black Queen attacks the White King while the White King is on the edge of the board, and Black has achieved checkmate.
Checkmates can be achieved in all kinds of interesting ways. At first, you will probably try and achieve these last two simple checkmates. After a while, though, you may try and get more complicated checkmates like the one from Monster Chess.
Sunday, June 13, 2010
A Beginner's Guide, Part 2, Chess Notation
This second part of the beginner's guide will be focused on chess notation. Learning chess notation is critical to effectively and efficiently improve your chess. However, a complete beginner may want to spend some time getting used to how the pieces move by playing Chess Titans or another computer program before trying to understand chess notation. If you do not understand how the pieces move very well, learning chess notation will be much more difficult and less helpful.
At the same time, reading broadly over Part 3 on Checkmate and Part 4 on Castling before reading this post may help the beginner get a better overall understanding of how to play chess. This post on chess notation is Part 2 of the beginner's guide, though, because it will be impossible to fully read Part 3 and Part 4 without understanding chess notation.
The major obstacle in learning chess notation is a language problem. Chess is written in a very simple language called algebraic notation. This simplicity is a great help to skilled players who understand the language. It is easy for them to look over the notations and figure out the moves very quickly. However, this simplicity can leave beginner's feeling very lost. The language of chess is not very explanatory.
On top of this, learning any language is difficult. It takes time and practice. Beginner's should understand and expect to feel lost in the early stages. If you found yourself in China (assuming you dont understand Chinese), you would feel very lost. You wouldnt expect yourself to be able to do all of the fun things you can do when you understand the native language.
Learning to read the notation takes time, and will likely give you a head ache. But, it is critical to improve your chess. Also, it allows you to better appreciate the chess games of the highest level players, both past and present. Thus, people who arent interested improving their chess can still benefit from learning chess notation.
Similar to learning the how the chess pieces move, the best way to learn chess notation is too practice. Before I get to how I recommend practicing, though, we should go through the basic ideas behind chess notation.
First, columns are lettered a through h, and rows are numbered 1 through 8. To notate a square, you would identify the column by "e", for example, and the row by "4", for example. Thus, by writing "e4", you notate the e4 square on the chess board.
Dont worry about understanding all of that just yet. Later on, I will show you a good way to practice learning chess notation. We are just trying to get a basic handle on the ideas of chess notation here.
The second thing you need to know is how to identify which piece moves to the square. Pieces are identified by a capital letter, which is placed in front of the "e4" that identifies the square.
The following shows the capital letters used in English chess notation:
King: K
Queen: Q
Rook: R
Bishop: B
Knight: N
Pawn: Nothing. If none of the above letters are used, then it is a pawn move. For exampled, e4, d5, e3, b5 are all notations for pawn moves.
Similar to how the pieces move, chess notation of the pieces is pretty straight forward except for the Knight and Pawn. Just use the first letter of the name of the piece! For the Knight, this is not possible because the King is identified with a K. Thus, you use the second letter of the word Knight, "N".
For pawns, for some reason, no letter is used. Every now and then you will see pawn moves notated with a "P". This is fairly rare, though.
As an example, then, if you want to show that a Knight moved to the e4 square, you would write "Ne4". If you want to show a pawn moving to e4, you write "e4". If you want to show a Bishop moving to e4, you write "Be4".
These are the basics of chess notation. However, there are a few other things you need to know.
First, when there is a capture, it is notated with an "x".
For example, if I take your Knight on f6 with my Knight, the notation will be Nxf6. Sometimes, the "x" is omitted. Thus, if I take your Knight of f6 with my Knight, it will be notated as Nf6. It is just assumed that my Knight took your Knight. This can be a bit confusing though, so usually a capture is notated with an "x".
Second, when there is a check, it is marked with a +. A checkmate is marked with an #. Thus, if I move my Bishop to attack your King, it will be notated Bb5+. If I move my Queen to checkmate your King, it will be notated Qe7#. To learn more about Checks and Checkmates, read A Beginner's Guide, Part 3, Winning.
Third, a King side castle is notated 0-0. A Queen side castle is notated 0-0-0. To learn more about Castling, read A Beginner's Guide, Part 4, Castling.
Now you know all the symbols used in chess notation. However, there is one more thing you need to know. Sometimes, two of the same type of pieces can move to the same square. It is necessary to clarify which piece actually moved to the square. If two pieces can move to a square, an extra letter or number is given to indicate which piece actually moved.
For instance, say you have a Knight on f6, and a Knight on b8.
Both of Black's Knights can move to the d7 square. So, if you play the b8 Knight to the d7 square, and only notate it Nd7, you wont know which Knight was the one that moved to the d7 square.
Instead, it is notated as Nbd7. The "b" indicates that it is the "b" Knight that moves to the d7 square, not the f6 Knight.
Sometimes, it is not possible to clarify which piece moves by letter, though. Say, for instance, you have a Knight on the d7 square and a Knight on the d5 square.
Both of Black's Knights can move to f6. If you write Ndf6, it will not clarify which Knight moved to f6. Thus, a number is used instead. If you move the d5 Knight to the f6 square, it will be notated N5f6. The "5" indicates that the Knight on the 5th rank is the one that moves.
Now you know everything you need to know to read and write chess! However, unless you are a very fast learner, you probably arent very fluent in chess notation yet.
Here is a good way to practice learning chess notation.
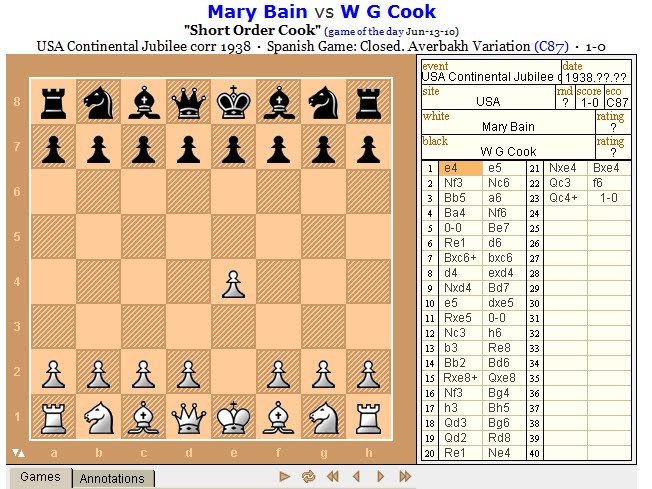
The first thing to do is go to a chess game website that uses algebraic notation and has the sides of the board labeled. My favorite site of this nature is chessgames.com. Clicking on the link will take you to the Chessgames.com's Game of the Day for June 13, 2010.
You should see the following: (Sorry the image is a little blurry, I am still figuring out some technical things)

As can be seen here, on the bottom of the chess board are the letters a through h indicating each of the 8 columns. On the left side of the chess board are the numbers 1 through 8 indicating the rows. Unfortunately, no numbers or letters are on the top or right side of the chess board. This isnt too big a deal though, but it may be helpful for you as a beginner to have the numbers and letter go the whole way around the chess board.
To the right of the chess board is a table with numbers in a smaller column 1 through 23. These numbers represent the move number. Beside this column of numbers are two larger columns. The first column next to "1" has has the notation "e4". This is White's first move. Because there is no letter in front of the e4, we know this represents a pawn move.
Looking at the numbers on the right side of the board, find the number "4". Then, looking at the letter at the bottom, find the letter "e". Go up the "e" column until you reach the "4" row. You have just found the square the pawn is going to move to. Only one of White's pawns can move to this square legally, and that is the pawn on e2. Therefore, you have just figured out that the pawn on e2 moves to the e4 square on White's first move.
If you are an absolute beginner, you may be a bit lost at this point. That is why we are using chessgames.com though, instead of doing it over the board.
Notice the arrows and buttons below the chessboard. From left to right, these are "Games", "Annotations", a large arrow that is "Play", a pair of curvy arrows that I believe flips the board (mine doesnt work), a double arrow pointing left that takes you to the beginning of the game, a single arrow pointing left that goes back one move, a single arrow pointing right goes forward a move, and a double arrow pointing right that takes you to the end of the game.
Right now, ignore all of these things but the single arrow pointing right. Click this arrow, and you should see the following:

That "1. e4" now appears on the board! Hopefully, this is the move you thought was indicated by 1. e4 meant. If it wasnt, that is ok. You will get the hang of chess notation eventually.
Hit the arrow again. You will see that Black's e pawn moved forward to e5. Looking at the list of moves, you will see that in the second column besides the "1", there is the notation "e5". This is Black's first move.
You can continue hitting the arrow button, and White's moves from the first column and Black's moves from the second column will be played.
When you get to White's 5th move, you will see "0-0" in the list of moves. Remember from above that this represents King side castling. "0-0-0" represents Queen side castling. Once again, for information about castling see my post A Beginner's Guide, Part 3, Castling.
Eventually you will get to White's 7th move, "Bxc6+". Remember the "x" represents a capture, and White has just captured Black's Knight. The "+" represents a Check, and Black's King is currently under attack by White's Bishop.
Interestingly, this game does not feature any moves where more than one of the same type of piece can use a square. So there isnt any "Nbd7" or "R2e4".
Finally, notice how the "#" symbol isnt used in this game. This is because the Black player, W G Cook resigned before getting checkmated. Cook resigned in the final position because he was about to lose his Light Squared Bishop on e4, and didnt want to play on a piece down. It is common in chess games for players to resign before they get checkmated.
Going through games on a chessgames.com or a similar site that shows the board, the 1 through 8 and a through h markings on the side of the board, and the moves on the side in algebraic notation is a good way to learn chess notation. Try and find the moves that are notated before clicking the next move arrow. Then, click the next move arrow and see if you are right. After a while, reading the chess notation will become second nature.
Another benefit from learning chess notation in this way, is that by going over these high level games you will begin developing your chess intuition. You will not understand a lot of what happens on the board, but your brain will start to put together various pattern. This is a critical part of improving your chess, and you will be getting a head start!
At the same time, reading broadly over Part 3 on Checkmate and Part 4 on Castling before reading this post may help the beginner get a better overall understanding of how to play chess. This post on chess notation is Part 2 of the beginner's guide, though, because it will be impossible to fully read Part 3 and Part 4 without understanding chess notation.
The major obstacle in learning chess notation is a language problem. Chess is written in a very simple language called algebraic notation. This simplicity is a great help to skilled players who understand the language. It is easy for them to look over the notations and figure out the moves very quickly. However, this simplicity can leave beginner's feeling very lost. The language of chess is not very explanatory.
On top of this, learning any language is difficult. It takes time and practice. Beginner's should understand and expect to feel lost in the early stages. If you found yourself in China (assuming you dont understand Chinese), you would feel very lost. You wouldnt expect yourself to be able to do all of the fun things you can do when you understand the native language.
Learning to read the notation takes time, and will likely give you a head ache. But, it is critical to improve your chess. Also, it allows you to better appreciate the chess games of the highest level players, both past and present. Thus, people who arent interested improving their chess can still benefit from learning chess notation.
Similar to learning the how the chess pieces move, the best way to learn chess notation is too practice. Before I get to how I recommend practicing, though, we should go through the basic ideas behind chess notation.
First, columns are lettered a through h, and rows are numbered 1 through 8. To notate a square, you would identify the column by "e", for example, and the row by "4", for example. Thus, by writing "e4", you notate the e4 square on the chess board.
Dont worry about understanding all of that just yet. Later on, I will show you a good way to practice learning chess notation. We are just trying to get a basic handle on the ideas of chess notation here.
The second thing you need to know is how to identify which piece moves to the square. Pieces are identified by a capital letter, which is placed in front of the "e4" that identifies the square.
The following shows the capital letters used in English chess notation:
King: K
Queen: Q
Rook: R
Bishop: B
Knight: N
Pawn: Nothing. If none of the above letters are used, then it is a pawn move. For exampled, e4, d5, e3, b5 are all notations for pawn moves.
Similar to how the pieces move, chess notation of the pieces is pretty straight forward except for the Knight and Pawn. Just use the first letter of the name of the piece! For the Knight, this is not possible because the King is identified with a K. Thus, you use the second letter of the word Knight, "N".
For pawns, for some reason, no letter is used. Every now and then you will see pawn moves notated with a "P". This is fairly rare, though.
As an example, then, if you want to show that a Knight moved to the e4 square, you would write "Ne4". If you want to show a pawn moving to e4, you write "e4". If you want to show a Bishop moving to e4, you write "Be4".
These are the basics of chess notation. However, there are a few other things you need to know.
First, when there is a capture, it is notated with an "x".
For example, if I take your Knight on f6 with my Knight, the notation will be Nxf6. Sometimes, the "x" is omitted. Thus, if I take your Knight of f6 with my Knight, it will be notated as Nf6. It is just assumed that my Knight took your Knight. This can be a bit confusing though, so usually a capture is notated with an "x".
Second, when there is a check, it is marked with a +. A checkmate is marked with an #. Thus, if I move my Bishop to attack your King, it will be notated Bb5+. If I move my Queen to checkmate your King, it will be notated Qe7#. To learn more about Checks and Checkmates, read A Beginner's Guide, Part 3, Winning.
Third, a King side castle is notated 0-0. A Queen side castle is notated 0-0-0. To learn more about Castling, read A Beginner's Guide, Part 4, Castling.
Now you know all the symbols used in chess notation. However, there is one more thing you need to know. Sometimes, two of the same type of pieces can move to the same square. It is necessary to clarify which piece actually moved to the square. If two pieces can move to a square, an extra letter or number is given to indicate which piece actually moved.
For instance, say you have a Knight on f6, and a Knight on b8.
Both of Black's Knights can move to the d7 square. So, if you play the b8 Knight to the d7 square, and only notate it Nd7, you wont know which Knight was the one that moved to the d7 square.
Instead, it is notated as Nbd7. The "b" indicates that it is the "b" Knight that moves to the d7 square, not the f6 Knight.
Sometimes, it is not possible to clarify which piece moves by letter, though. Say, for instance, you have a Knight on the d7 square and a Knight on the d5 square.
Both of Black's Knights can move to f6. If you write Ndf6, it will not clarify which Knight moved to f6. Thus, a number is used instead. If you move the d5 Knight to the f6 square, it will be notated N5f6. The "5" indicates that the Knight on the 5th rank is the one that moves.
Now you know everything you need to know to read and write chess! However, unless you are a very fast learner, you probably arent very fluent in chess notation yet.
Here is a good way to practice learning chess notation.
The first thing to do is go to a chess game website that uses algebraic notation and has the sides of the board labeled. My favorite site of this nature is chessgames.com. Clicking on the link will take you to the Chessgames.com's Game of the Day for June 13, 2010.
You should see the following: (Sorry the image is a little blurry, I am still figuring out some technical things)

As can be seen here, on the bottom of the chess board are the letters a through h indicating each of the 8 columns. On the left side of the chess board are the numbers 1 through 8 indicating the rows. Unfortunately, no numbers or letters are on the top or right side of the chess board. This isnt too big a deal though, but it may be helpful for you as a beginner to have the numbers and letter go the whole way around the chess board.
To the right of the chess board is a table with numbers in a smaller column 1 through 23. These numbers represent the move number. Beside this column of numbers are two larger columns. The first column next to "1" has has the notation "e4". This is White's first move. Because there is no letter in front of the e4, we know this represents a pawn move.
Looking at the numbers on the right side of the board, find the number "4". Then, looking at the letter at the bottom, find the letter "e". Go up the "e" column until you reach the "4" row. You have just found the square the pawn is going to move to. Only one of White's pawns can move to this square legally, and that is the pawn on e2. Therefore, you have just figured out that the pawn on e2 moves to the e4 square on White's first move.
If you are an absolute beginner, you may be a bit lost at this point. That is why we are using chessgames.com though, instead of doing it over the board.
Notice the arrows and buttons below the chessboard. From left to right, these are "Games", "Annotations", a large arrow that is "Play", a pair of curvy arrows that I believe flips the board (mine doesnt work), a double arrow pointing left that takes you to the beginning of the game, a single arrow pointing left that goes back one move, a single arrow pointing right goes forward a move, and a double arrow pointing right that takes you to the end of the game.
Right now, ignore all of these things but the single arrow pointing right. Click this arrow, and you should see the following:
That "1. e4" now appears on the board! Hopefully, this is the move you thought was indicated by 1. e4 meant. If it wasnt, that is ok. You will get the hang of chess notation eventually.
Hit the arrow again. You will see that Black's e pawn moved forward to e5. Looking at the list of moves, you will see that in the second column besides the "1", there is the notation "e5". This is Black's first move.
You can continue hitting the arrow button, and White's moves from the first column and Black's moves from the second column will be played.
When you get to White's 5th move, you will see "0-0" in the list of moves. Remember from above that this represents King side castling. "0-0-0" represents Queen side castling. Once again, for information about castling see my post A Beginner's Guide, Part 3, Castling.
Eventually you will get to White's 7th move, "Bxc6+". Remember the "x" represents a capture, and White has just captured Black's Knight. The "+" represents a Check, and Black's King is currently under attack by White's Bishop.
Interestingly, this game does not feature any moves where more than one of the same type of piece can use a square. So there isnt any "Nbd7" or "R2e4".
Finally, notice how the "#" symbol isnt used in this game. This is because the Black player, W G Cook resigned before getting checkmated. Cook resigned in the final position because he was about to lose his Light Squared Bishop on e4, and didnt want to play on a piece down. It is common in chess games for players to resign before they get checkmated.
Going through games on a chessgames.com or a similar site that shows the board, the 1 through 8 and a through h markings on the side of the board, and the moves on the side in algebraic notation is a good way to learn chess notation. Try and find the moves that are notated before clicking the next move arrow. Then, click the next move arrow and see if you are right. After a while, reading the chess notation will become second nature.
Another benefit from learning chess notation in this way, is that by going over these high level games you will begin developing your chess intuition. You will not understand a lot of what happens on the board, but your brain will start to put together various pattern. This is a critical part of improving your chess, and you will be getting a head start!
A Beginner's Guide, Part 1, How do the pieces move?
A lot of people with an interest in chess dont ever follow through with that interest because chess is difficult, time consuming, and to a certain degree a pain! However, chess can be a very rewarding hobby. A major obstacle to beginner's getting these rewards, though, is starting out. Starting out studying chess and focusing on improving is probably the most difficult part about chess. However, with appropriate guidance, some of the worst obstacles can be overcome.
The first major obstacle in starting out playing chess is learning how the pieces move. It takes a while to get a handle on how the pieces move. Unfortunately, I will not be able to provide that much help in this area, as I learned how the pieces moved when I was very young. I dont really remember how it happened, it just happened. Also, I am somewhat doubtful anyone can provide much help. That said, Chess for Beginners is a nice looking site that could be helpful. Chess, the wikipedia article has some very nice diagrams that should get you started. [I was actually going to add some diagrams, but it would just be repeating information that is already thoroughly on the internet elsewhere.]
Really, though, there are no tricks to learning how the pieces move. You just have to make it part of your intuition, your subconscious. The best way to learn how the pieces move is simply to watch chess games and play chess games. Most Windows computers these days come with a program called Chess Titans. Playing a bunch of games on this program should help you figure out how the pieces move. Very helpfully, Chess Titans will not let you make illegal moves! This should help the beginner get a handle on how the pieces move.
If your computer does not have Chess Titans, you can get free chess programs off the internet that will do the same thing. I will discuss the various computer programs you can use in A Beginner's Guide, Part ??, Computer Chess Programs, but for now just use Arena. This is the program I will recommend, anyway, though other programs are worth looking at.
Even simpler, just visit Shredder, and you can play against the computer without even having to download anything.
As far as verbal cues as to how the pieces move, here is a very simple list that may help:
King: 1 square in any direction
Rook: Lines, up and down or side to side
Bishop: Diagonals
Queen: Can move like a Rook or a Bishop, both Lines and Diagonals
Knight: This is the trickiest piece. Moves in an L-shape and is the only piece that can jump over other pieces
Pawns: Also very tricky. Pawns can move 1 square forward, but cannot capture the 1 square forward. Pawns can capture two squares, diagonally to the right and diagonally to the left.
Pawns also have two special moves. The first is that a Pawn can move 2 squares forward on its first move. The second is something called en passant. As a beginner, dont worry about en passant until it comes up. It rarely comes up, and will just confuse you at these early stages.
So as can be seen, only the Knights and Pawns should give the beginner any trouble. The other pieces move in fairly straight forward ways. Just remember: King, 1 square in any direction; Queen, moves like a Rook and a Bishop; Rook, moves in straight lines up and down or side to side; Bishop, moves on the diaganol; Knight, tricky L Shape; Pawns, straight ahead 1 square, but captures ahead 1 square diagonally.
Reading over the above a few times should give you a fairly decent grasp on how the pieces move. You will probably forget, though. Dont worry about it. That is why you are using the computer, so it can remind you!
A last thing to mention is Castling. Just know that it exists, but dont worry about it too much at this stage. Even World Champion Candidates have difficulty with that one! [Korchnoi v. Karpov, look at the 18th move]. A beginner should not spend too much time worrying about it.
For more information about castling, read A Beginner's Guide, Part 4, Castling.
The best way to learn how the chess pieces move, and this is generally good advice, is to just ignore your own deficiencies. When you bungle some move, or you didnt see your opponent's threat, that is fine, and should be expected. You shouldnt fret about these inaccuracies. Instead just work on building up your intuitive vision. After you play and watch enough chess games, you will not make those mistakes anymore.
It is especially easy for adults to get frustrated when they screw up. This probably is the major reason children learn so much faster than adults, though I am no expert in this matter. Adults are more prone to getting frustrated and quitting, whereas children dont really even realize how hard something is and keep at it. It helps that children have tons of time.
I may be hitting you over the head too much with this, but seriously, do not get frustrated! Just play games over and over again and expect to lose. Your brain is an exceptional tool, and will do all of the learning for you, so long as you dont get in the way!
If you are a child, or if you are reading this because you want a child to learn the moves, it shouldnt be all that difficult, honestly. So long as they enjoy the game, they will probably just pick it up without even really thinking about it. I am not a parent, so I dont know much about raising children, but if the child is not interested in even learning the moves, maybe chess is not for them. Or, maybe it is just the wrong time.
If you are trying to force a child to learn the moves of chess, I would guess making it as fun as possible is the best way to go. Also, perhaps rather than forcing them to play chess, just prohibit them from doing other activities that you do not want them to do.
Saying, you can do whatever you want, but you cant watch TV or play video games, seems like it would be better than saying, we are going to sit here for an hour and you are going to learn how to play chess. The kid is probably going to want to do something, and so long as other things like TV and video games are eliminated, the kid will do something more productive.
Like I said, I am no parent, though, so I am not even sure why I am giving this advice. My advice seems to make sense, though, so more likely than not it is totally wrong! To all parents, good luck!
What a tangent. As a recap, the best way to learn how the chess pieces move is to play games of chess on the computer. The computer will not let you make illegal moves, so you will know instantly when you screw something up. Do not get frustrated if you miss a move by the computer and get checkmated or lose your queen. That is part of the learning process, and if you play enough of these games you will get the hang of it. Remember, you are playing to learn, not to win.
Subscribe to:
Posts (Atom)

